MiFlora Modul

Mein MiFlorasystem läuft wieder.
Das erste reboot wurde wahrscheinlich durch schlechte Leitung nicht ausgeführt. Nach nochmaligen reboot läufts.

Aber noch eine allgemeine Frage zu Linux. Gibt es ein Kommando damit allgemeine Systeminformationen ausgegeben werden? Z.B. die Laufzeit?

Zuerst einmal herzlichen Dank für die Super Scripts die Ihr hier gepostet habt.

Ich habe im Moment auf ca. 3.000 m² Fläche 27 Sensoren (Im Endausbau werden es ~40 sein) und 4 Raspberry ZERO installiert.
Im ersten Schritt wollte ich wissen wie alt die Information ist die vom Sensor vorliegt.

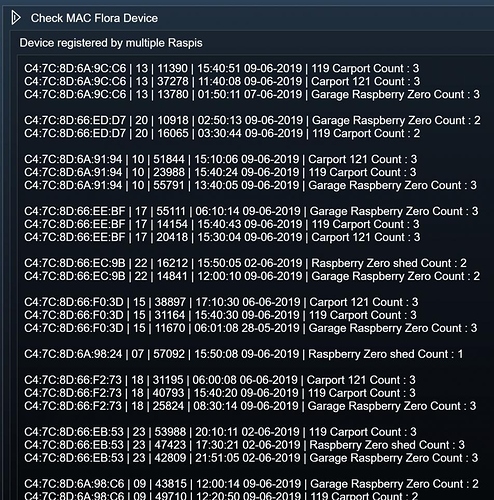
Da einzelne Sensoren ihre Daten an mehrer Raspberries schicken können legt das FLORA Modul den gleichen Sensor unter den jeweiligen IP Adressen der Raspberries mehrfach an (Das heißt die MAC Adresse oder UUID ist in Symcon mehrfach vorhanden)
Ich habe jedem Sensor mit identischer UUID händisch den gleichen Namen gegeben (Nummer von 0 bis 26)

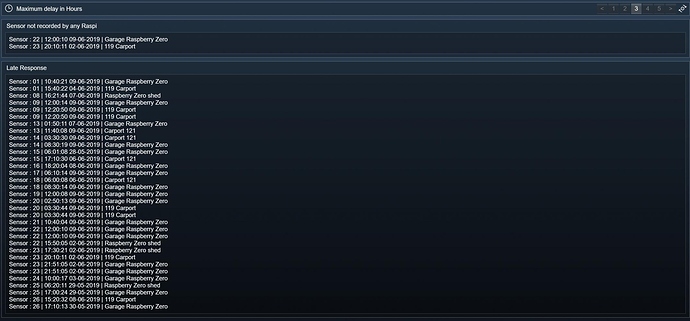
Das Script wertet die UUID sowie die variable „Letzte Meldung“ aus und zeigt zum einen an welcher Sensor von keinem einzigen Raspberry Daten oberhalb der Zeit schwelle erhalten hat und zum anderen werden in einer weiteren Variablen alle verspäteten Sensoren gelistet. Damit war es mir möglich defekte Sensoren zu identifizieren und auszutauschen bzw. mit einer neuen Batterie auszustatten oder eine Reset durchzuführen

Das Script ist hier :

<?php
// Integer Variable anlegen  um das Alter der letzten Meldung  in Stunden zu definieren (Hier 46088)
// Zwei String Variablen  zur Anzeige anlegen Hier : 49733 und 46143
if(IPS_VariableExists (46088))
{
    $max_hours_delay = 60*60*GetValueInteger(46088);
}
else  
{
    $max_hours_delay = 60*60*4;// Da keine Variable gefunden wurde wird der default Wert von 4 Stunden genommen
}
$objects = IPS_GetObjectList ();

$data = NULL;
$data_set[] = NULL;
foreach($objects as $key => $value) // Loop über alle Objekte
{
  if(IPS_GetName ($value) === "Letzte Meldung") // Time Stamp Variable gefunden
  {
     $delta = time() - strtotime(GetValueString($value));
     if( $delta > $max_hours_delay) // Es gibt einen Delay
     {
        $MAC1_parent =  IPS_GetParent (IPS_GetParent ($value));
        $MAC1_timestamp = GetValueString(IPS_GetObjectIDByName ('Letzte Meldung', IPS_GetParent ($value)));
        $MAC1_adresse = GetValueString(IPS_GetObjectIDByName ('UUID', IPS_GetParent ($value)));
        $data2_set[] =  " Sensor : ".IPS_GetName (IPS_GetParent($value))." | ".GetValueString($value)." | ".GetValueString(IPS_GetObjectIDByName ('Hubs',IPS_GetParent ($value) )).'<br />';

        $receive_signal_of_sensor = false;
        foreach($objects as $key1 => $value1) // 
        {      
            if(IPS_GetName ($value1) === "UUID")
            {
                $MAC2_parent =  IPS_GetParent (IPS_GetParent ($value1));
                $MAC2_timestamp = GetValueString(IPS_GetObjectIDByName ('Letzte Meldung', IPS_GetParent ($value1)));
                $MAC2_adresse = GetValueString(IPS_GetObjectIDByName ('UUID', IPS_GetParent ($value1)));
                if($MAC1_adresse === $MAC2_adresse)
                {
                    if ($MAC1_parent <> $MAC2_parent)
                    {
                        $delta1 = time() - strtotime($MAC2_timestamp);
                        if( $delta1 < $max_hours_delay) 
                        {
                            $receive_signal_of_sensor = true;
                            break;
                        } 
                        else
                        {

                        }                 
                    }   
                }
            }
        }
        if (!$receive_signal_of_sensor)
        {
            $data =  $data." Sensor : ".IPS_GetName (IPS_GetParent($value))." | ".GetValueString($value)." | ".GetValueString(IPS_GetObjectIDByName ('Hubs',IPS_GetParent ($value) )).'<br />';
            $treffer = false;
            foreach( $data_set as $key3 => $value3)
            {
                if(strpos (" Sensor : ".$value3." | " , IPS_GetName (IPS_GetParent($value))))
                {
                    $treffer = true;
                    break;   
                }
            }
            if(!$treffer)
            {  
                $data_set[] =  " Sensor : ".IPS_GetName (IPS_GetParent($value))." | ".GetValueString($value)." | ".GetValueString(IPS_GetObjectIDByName ('Hubs',IPS_GetParent ($value) )).'<br />';
            }


        }

    }
  }
}


asort($data_set);
asort($data2_set);

if(IPS_VariableExists (49733))
{
    SetValueString(49733,implode ($data_set));
} 
else 
{
    Print_r ($data_set );
}

if(IPS_VariableExists (49733))
{
    SetValueString(46143,implode ($data2_set));
} 
else 
{
    Print_r ($data_set );
}


Dieses Script listet für jeden Sensor die Raspberries auf die Daten des Sensors empfangen können :

<?php

// String Variable für die Anzeige anlegen

$objects = IPS_GetObjectList ();

foreach($objects as $key => $value)
{
 if(IPS_GetName ($value) === "UUID")
 {
     // Diese Abfrage macht nur Sinn wenn das Script in Teil 3 installiert wurde. 
     if(IPS_GetParent (IPS_GetParent ($value)) != 42309)
     {   
        $data[$value] = GetValueString($value)." | ".IPS_GetName(IPS_GetParent ($value))." | ".$value." | ".GetValueString(IPS_GetObjectIDByName ('Letzte Meldung', IPS_GetParent ($value)))." | ". GetValueString(IPS_GetObjectIDByName ('Hubs',IPS_GetParent ($value) ));
        $mac1[$value] = GetValueString($value);
        $ID[$value] = IPS_GetName(IPS_GetParent ($value));
    }
 }

}

$mac_unique1 = array_unique ($mac1);
$double = "";
$count = array_count_values ($mac1);
foreach($mac_unique1 as $key1 => $value1 )
{
    foreach(  $mac1 as $key2 => $value2)
    {
        if ($value1 == $value2)
        {
             $double = $double.$data[$key2]." Count : ".$count[$value2].'<br />';
        }
    }
    $double = $double.'<br />';
}


if(IPS_VariableExists (12163))
{
    SetValueString(46143,$double);
} 
else 
{
    Print_r ($double );
}


Sollte ein Sensor von mehreren Raspberries empfangen werden und sollte sich dieser HUB (Raspberry) aus welchen Gründen auch immer ändern erscheint es sinnvoll einen übergeordneten virtuellen Sensor anzulegen dessen Variablen pro Abfrage die Daten des Raspberries speichern der die aktuellsten Information enthält.

Dieses Script überprüft alle im System bekannten Sensoren auf Ihren Zeitstempel. Sollte der virtuelle Sensor nicht vorhanden sein wird er automatisch angelegt. Pro Aufruf werden alle virtuellen Sensoren mit den jeweils aktuellsten Daten bestückt.

<?php
set_time_limit(700);

// Bitte die folgenden Daten eintragen

$Parent_ID_Ziel_Ordner = 42309; // Das ist die Kategorie oberhalb dieses Skriptes 
$Archiv_ID = 14817; // ID des Archiv dba_handlers

// Ende der Konfiguration

$objects = IPS_GetObjectList ();
foreach($objects as $key => $object_id) // Alle Sensoren im System finden 
{
    if(IPS_GetName ($object_id) === "UUID")
    {
        $Quell_Ordner_ID_Sensor = IPS_GetParent($object_id);
        $Quell_Ordner_Raspberry = IPS_GetParent( $Quell_Ordner_ID_Sensor);
        if($Quell_Ordner_Raspberry  != $Parent_ID_Ziel_Ordner)  // Zielsensoren ausschliessen
        {
            $Source_MAC = GetValueString($object_id);
            $sensorenliste[ $Quell_Ordner_ID_Sensor] = $Source_MAC ;
        }
    }

}


foreach($sensorenliste as  $Quell_Ordner_ID_Sensor =>  $Source_MAC ) // Den Raspberry finden der für den jeweiligen Sensor den jüngsten Zeitstempel hat
{
    $parent_id =  IPS_GetParent( $Quell_Ordner_ID_Sensor);
    $time_stamp_source = strtotime(GetValueString(IPS_GetObjectIDByName ('Letzte Meldung',  $Quell_Ordner_ID_Sensor))); // Zeitstempel merken
    $most_recent[ $Source_MAC] =  $time_stamp_source;
    $parent_aktuellste_werte[ $Source_MAC] =   $Quell_Ordner_ID_Sensor;
    foreach(  $sensorenliste as $Quell_Ordner_ID_Sensor_1 => $Source_MAC_1) //Suche weitere Sensoren mit gleicher MAC Adresse
    {
        if ( $Source_MAC == $Source_MAC_1) // Gleicher Sensor bei einem anderen Raspberry gefunden
        {
              $time_stamp_1 = strtotime(GetValueString(IPS_GetObjectIDByName ('Letzte Meldung', $Quell_Ordner_ID_Sensor_1))); // Nächster Zeitstempel 
              if($time_stamp_1  > $time_stamp_source )
              {
                  $time_stamp_source = $time_stamp_1;
                  $most_recent[ $Source_MAC] =  $time_stamp_source;
                  $parent_aktuellste_werte[ $Source_MAC] =   $Quell_Ordner_ID_Sensor_1;
              }
        }

    }
}

// Die aktuellsten Werte in den Ziel Sensor übertragen
$Ziel_sensor_ids = IPS_GetChildrenIDs (42309);
foreach($parent_aktuellste_werte as $Source_MAC => $Quell_Ordner_ID_Sensor_ID) // Loop durch alle  sensoren mit den aktuellsten werten
{
    $Neuer_Sensor_gefunden = true;
    foreach($Ziel_sensor_ids as $key4 => $Ziel_Sensor_ID) // Loop durch alle Ziel Sensoren 
    {
        if(IPS_GetObjectIDByName ("UUID",$Ziel_Sensor_ID)) // Ist das ein Sensor ?
        {
            $Ziel_MAC = GetValueString(IPS_GetObjectIDByName ("UUID",$Ziel_Sensor_ID));
            if($Ziel_MAC == $Source_MAC) // Ist das der Richtige Ziel Sensor ???
            {
                $Neuer_Sensor_gefunden = false;
                $Ziel_sensor_values_ids = IPS_GetChildrenIDs($Ziel_Sensor_ID);
                foreach( $Ziel_sensor_values_ids as $key5 => $Ziel_Variablen_ID) // aktuellste Werte in den Ziel Sensor eintragen
                {
                    $ID_Zielvariable = $Ziel_Variablen_ID;
                    $ID_Sourcevariable_parent = $Quell_Ordner_ID_Sensor_ID;
                    $Name_Zielvariable = IPS_GetName( $ID_Zielvariable);
                    $wert = GetValue(IPS_GetObjectIDByName($Name_Zielvariable,$ID_Sourcevariable_parent));
//                    echo $ID_Zielvariable ." ".$ID_Sourcevariable_parent." ".$Name_Zielvariable." ".$wert." ";
                    SetValue($ID_Zielvariable, $wert);

                }
            }
            else // Nicht der Richtige Zielsensor
            {
               
            }
        }
        else // Objekt ist Kein Sensor 
        {
            
            
        }

    }
    if($Neuer_Sensor_gefunden) // Es wurde ein neuer Sensor gefunden für den jetzt ein Ziel Sensor mit allen Variablen angelegt werden muss
    {
        // Neuen Ziel Sensor anlegen
        $Ziel_Parent_ID = IPS_GetParent($Ziel_Sensor_ID);
        $Ziel_Sensor_Name = IPS_GetName ($Quell_Ordner_ID_Sensor_ID);
        $sensor_ziel_id = IPS_CreateCategory();       // Kategorie anlegen
        IPS_SetName($sensor_ziel_id,  $Ziel_Sensor_Name); // Kategorie benennen
        IPS_SetParent($sensor_ziel_id, $Parent_ID_Ziel_Ordner); 
        // Variablen des neuen Ziel Sensors anlegen und befüllen 

        $Quellen_sensor_values_ids = IPS_GetChildrenIDs($Quell_Ordner_ID_Sensor_ID);
        foreach(  $Quellen_sensor_values_ids as $key6 => $Quell_Variablen_ID) // aktuellste Werte in den Ziel Sensor eintragen
        {

            $Ziel_variable_Name = IPS_GetName ( $Quell_Variablen_ID);
            $Ziel_Variable_Typ = IPS_GetVariable ($Quell_Variablen_ID)['VariableType'];
            $Ziel_Variable_Profil = IPS_GetVariable ($Quell_Variablen_ID)['VariableProfile'];

            $Ziel_Variable_Custom_Action = IPS_GetVariable ($Quell_Variablen_ID)['VariableCustomAction'];
            $Ziel_Variable_Custom_Profil = IPS_GetVariable ($Quell_Variablen_ID)['VariableCustomProfile'];

            $VarID_Ziel = IPS_CreateVariable($Ziel_Variable_Typ);
            IPS_SetVariableCustomAction ($VarID_Ziel, $Ziel_Variable_Custom_Action);
            IPS_SetVariableCustomProfile ($VarID_Ziel,$Ziel_Variable_Custom_Profil );
            IPS_SetName($VarID_Ziel, $Ziel_variable_Name); // Variable benennen
            IPS_SetParent($VarID_Ziel, $sensor_ziel_id); 
            IPS_SetPosition ($VarID_Ziel , intval( $Ziel_variable_Name));
            AC_SetLoggingStatus($Archiv_ID, $VarID_Ziel, true);
            AC_SetAggregationType($Archiv_ID, $VarID_Ziel, 0); // Standard
            AC_SetGraphStatus($Archiv_ID/*[Archive]*/,$VarID_Ziel, true);
            IPS_ApplyChanges($Archiv_ID);
            $wert = GetValue(IPS_GetObjectIDByName($Ziel_variable_Name,$Quell_Ordner_ID_Sensor_ID));
            SetValue($VarID_Ziel, $wert);
        }

    }

}

//print_r($parent_aktuellste_werte);


Hallo,

nachdem mein Koubachi den Geist aufgegeben hat, muss nun etwas neues her. Da kommt dieses Projekt wie gerufen.

Ich versuche nun einen Pflanzensensor über einen RaspberryPi Zero W in IPS einzubinden.

Leider hänge ich gerade bei der Installation des Raspi fest. Die Installation des Betriebssystems hat funktioniert, auch konnte ich die Installationskommandos aus der Readme.txt abarbeiten. Bis zu dem Punkt

pip3 install gattlib

Bei der Ausführung bleibt die Installation immer hängen.

Wenn ich es mit der Option -v starte, dann erhalte ich folgende Ausgaben:


pi@miflora:~ $ pip3 -v install gattlib
Created temporary directory: /tmp/pip-ephem-wheel-cache-_gucrdu7
Created temporary directory: /tmp/pip-req-tracker-y0zx405w
Created requirements tracker '/tmp/pip-req-tracker-y0zx405w'
Created temporary directory: /tmp/pip-install-7yrzd0_l
Looking in indexes: https://pypi.org/simple, https://www.piwheels.org/simple
Collecting gattlib
  2 location(s) to search for versions of gattlib:
  * https://pypi.org/simple/gattlib/
  * https://www.piwheels.org/simple/gattlib/
  Getting page https://pypi.org/simple/gattlib/
  Looking up "https://pypi.org/simple/gattlib/" in the cache
  Current age based on date: 50251
  Freshness lifetime from max-age: 600
  Freshness lifetime from request max-age: 0
  Starting new HTTPS connection (1): pypi.org:443
  https://pypi.org:443 "GET /simple/gattlib/ HTTP/1.1" 304 0
  Analyzing links from page https://pypi.org/simple/gattlib/
    Found link https://files.pythonhosted.org/packages/7c/8f/861dbcc3da19f8324f5e0ac6940a2df682d2108d43d5fc734403be1c787a/gattlib-0.20150119.linux-x86_64.tar.gz#sha256=efe7d3133549c9f708317da5da1f388acf74c4f57221d5385f40828203f54e3d (from https://pypi.org/simple/gattlib/), version: 0.20150119.linux-x86_64
    Found link https://files.pythonhosted.org/packages/e1/b7/b8ef5aa35b93dc013a18918dafc1da50df7a1c0cdb43710224e71a7a060c/gattlib-0.20150119.tar.gz#sha256=73f4a8255c467f5010e042c33f1c06481ebe1d8fa41a6b556ca5061a31d988bc (from https://pypi.org/simple/gattlib/), version: 0.20150119
    Found link https://files.pythonhosted.org/packages/43/de/2ae25758e14447c2195b3628a5a5b50451977e39ac5196c53ece2d58784c/gattlib-0.20150130.tar.gz#sha256=a24157e5a32f4b37ef206d09c083e54cff1f05efadee8cea0da3446f256f7626 (from https://pypi.org/simple/gattlib/), version: 0.20150130
    Found link https://files.pythonhosted.org/packages/de/b9/6aa639cefedae3f81f79261ad8dfc4fe7c8f0c98a4434b2b4edda89040f6/gattlib-0.20150131.tar.gz#sha256=9d574eaa9688978a3e920085c4adf2e66b832eaa81ce5cf21ef90b668f53794d (from https://pypi.org/simple/gattlib/), version: 0.20150131
    Found link https://files.pythonhosted.org/packages/be/2f/5b1aecec551b42b59d8b399ad444b5672972efb590ca83d784dbe616a3e1/gattlib-0.20150805.tar.gz#sha256=7f5fbc1613a0225f2af79683ca907fed40b765369c61cf90d023cbf4a92bdb0c (from https://pypi.org/simple/gattlib/), version: 0.20150805
  Getting page https://www.piwheels.org/simple/gattlib/
  Looking up "https://www.piwheels.org/simple/gattlib/" in the cache
  Current age based on date: 50251
  Freshness lifetime from request max-age: 0
  Starting new HTTPS connection (1): www.piwheels.org:443
  https://www.piwheels.org:443 "GET /simple/gattlib/ HTTP/1.1" 200 94
  Updating cache with response from "https://www.piwheels.org/simple/gattlib/"
  Caching due to etag
  Analyzing links from page https://www.piwheels.org/simple/gattlib/
  Using version 0.20150805 (newest of versions: 0.20150119, 0.20150130, 0.20150131, 0.20150805)
  Created temporary directory: /tmp/pip-unpack-wk028g79
  Looking up "https://files.pythonhosted.org/packages/be/2f/5b1aecec551b42b59d8b399ad444b5672972efb590ca83d784dbe616a3e1/gattlib-0.20150805.tar.gz" in the cache
  Current age based on date: 50370
  Freshness lifetime from max-age: 365000000
  The response is "fresh", returning cached response
  365000000 > 50370
  Using cached https://files.pythonhosted.org/packages/be/2f/5b1aecec551b42b59d8b399ad444b5672972efb590ca83d784dbe616a3e1/gattlib-0.20150805.tar.gz
  Downloading from URL https://files.pythonhosted.org/packages/be/2f/5b1aecec551b42b59d8b399ad444b5672972efb590ca83d784dbe616a3e1/gattlib-0.20150805.tar.gz#sha256=7f5fbc1613a0225f2af79683ca907fed40b765369c61cf90d023cbf4a92bdb0c (from https://pypi.org/simple/gattlib/)
  Added gattlib from https://files.pythonhosted.org/packages/be/2f/5b1aecec551b42b59d8b399ad444b5672972efb590ca83d784dbe616a3e1/gattlib-0.20150805.tar.gz#sha256=7f5fbc1613a0225f2af79683ca907fed40b765369c61cf90d023cbf4a92bdb0c to build tracker '/tmp/pip-req-tracker-y0zx405w'
  Running setup.py (path:/tmp/pip-install-7yrzd0_l/gattlib/setup.py) egg_info for package gattlib
    Running command python setup.py egg_info
    running egg_info
    creating pip-egg-info/gattlib.egg-info
    writing pip-egg-info/gattlib.egg-info/PKG-INFO
    writing dependency_links to pip-egg-info/gattlib.egg-info/dependency_links.txt
    writing top-level names to pip-egg-info/gattlib.egg-info/top_level.txt
    writing manifest file 'pip-egg-info/gattlib.egg-info/SOURCES.txt'
    reading manifest file 'pip-egg-info/gattlib.egg-info/SOURCES.txt'
    reading manifest template 'MANIFEST.in'
    writing manifest file 'pip-egg-info/gattlib.egg-info/SOURCES.txt'
  Source in /tmp/pip-install-7yrzd0_l/gattlib has version 0.20150805, which satisfies requirement gattlib from https://files.pythonhosted.org/packages/be/2f/5b1aecec551b42b59d8b399ad444b5672972efb590ca83d784dbe616a3e1/gattlib-0.20150805.tar.gz#sha256=7f5fbc1613a0225f2af79683ca907fed40b765369c61cf90d023cbf4a92bdb0c
  Removed gattlib from https://files.pythonhosted.org/packages/be/2f/5b1aecec551b42b59d8b399ad444b5672972efb590ca83d784dbe616a3e1/gattlib-0.20150805.tar.gz#sha256=7f5fbc1613a0225f2af79683ca907fed40b765369c61cf90d023cbf4a92bdb0c from build tracker '/tmp/pip-req-tracker-y0zx405w'
Building wheels for collected packages: gattlib
  Created temporary directory: /tmp/pip-wheel-u3eeq2tz
  Running setup.py bdist_wheel for gattlib ...   Destination directory: /tmp/pip-wheel-u3eeq2tz
  Running command /usr/bin/python3 -u -c "import setuptools, tokenize;__file__='/tmp/pip-install-7yrzd0_l/gattlib/setup.py';f=getattr(tokenize, 'open', open)(__file__);code=f.read().replace('
', '
');f.close();exec(compile(code, __file__, 'exec'))" bdist_wheel -d /tmp/pip-wheel-u3eeq2tz --python-tag cp37
  running bdist_wheel
  running build
  running build_ext
  building 'gattlib' extension
  creating build
  creating build/temp.linux-armv6l-3.7
  creating build/temp.linux-armv6l-3.7/src
  creating build/temp.linux-armv6l-3.7/src/bluez
  creating build/temp.linux-armv6l-3.7/src/bluez/lib
  creating build/temp.linux-armv6l-3.7/src/bluez/attrib
  creating build/temp.linux-armv6l-3.7/src/bluez/src
  creating build/temp.linux-armv6l-3.7/src/bluez/src/shared
  creating build/temp.linux-armv6l-3.7/src/bluez/btio
  arm-linux-gnueabihf-gcc -pthread -DNDEBUG -g -fwrapv -O2 -Wall -g -fstack-protector-strong -Wformat -Werror=format-security -Wdate-time -D_FORTIFY_SOURCE=2 -fPIC -DVERSION="5.25" -I/usr/include/glib-2.0 -I/usr/lib/arm-linux-gnueabihf/glib-2.0/include -Isrc/bluez -I/usr/include/python3.7m -c src/gattservices.cpp -o build/temp.linux-armv6l-3.7/src/gattservices.o
  arm-linux-gnueabihf-gcc -pthread -DNDEBUG -g -fwrapv -O2 -Wall -g -fstack-protector-strong -Wformat -Werror=format-security -Wdate-time -D_FORTIFY_SOURCE=2 -fPIC -DVERSION="5.25" -I/usr/include/glib-2.0 -I/usr/lib/arm-linux-gnueabihf/glib-2.0/include -Isrc/bluez -I/usr/include/python3.7m -c src/beacon.cpp -o build/temp.linux-armv6l-3.7/src/beacon.o
  arm-linux-gnueabihf-gcc -pthread -DNDEBUG -g -fwrapv -O2 -Wall -g -fstack-protector-strong -Wformat -Werror=format-security -Wdate-time -D_FORTIFY_SOURCE=2 -fPIC -DVERSION="5.25" -I/usr/include/glib-2.0 -I/usr/lib/arm-linux-gnueabihf/glib-2.0/include -Isrc/bluez -I/usr/include/python3.7m -c src/bindings.cpp -o build/temp.linux-armv6l-3.7/src/bindings.o

und es geht dann nicht mehr weiter. Hat da jemand einen Tipp für mich? Ich bin wirklich ratlos.

Vielen Dank!

Burkhard

Das Problem hatte ich auch. Sobald ich an meinem Computer bin poste ich eine Anleitung

Sent from my Pixel 2 using Tapatalk

hallo,

schau mal in meinen Beitrag #55 und #58 hier in dem Modulthreat.
War bei mir damals das Problem und die Lösung.

Lieben Gruß
Adam

Besten Dank für eure Hinweise mit dem swapfile.

Zunächst sah es auch gut aus, aber dann bricht er ein gutes Stück weiter doch wieder ab


    creating build/lib.linux-armv6l-3.7
    arm-linux-gnueabihf-g++ -pthread -shared -Wl,-O1 -Wl,-Bsymbolic-functions -Wl,-z,relro -Wl,-z,relro -g -fstack-protector-strong -Wformat -Werror=format-security -Wdate-time -D_FORTIFY_SOURCE=2 build/temp.linux-armv6l-3.7/src/gattservices.o build/temp.linux-armv6l-3.7/src/beacon.o build/temp.linux-armv6l-3.7/src/bindings.o build/temp.linux-armv6l-3.7/src/gattlib.o build/temp.linux-armv6l-3.7/src/bluez/lib/uuid.o build/temp.linux-armv6l-3.7/src/bluez/attrib/gatt.o build/temp.linux-armv6l-3.7/src/bluez/attrib/gattrib.o build/temp.linux-armv6l-3.7/src/bluez/attrib/utils.o build/temp.linux-armv6l-3.7/src/bluez/attrib/att.o build/temp.linux-armv6l-3.7/src/bluez/src/shared/crypto.o build/temp.linux-armv6l-3.7/src/bluez/src/log.o build/temp.linux-armv6l-3.7/src/bluez/btio/btio.o -lglib-2.0 -lboost_python-py34 -lboost_thread -lbluetooth -o build/lib.linux-armv6l-3.7/gattlib.cpython-37m-arm-linux-gnueabihf.so
    /usr/bin/ld: cannot find -lboost_python-py34
    collect2: error: ld returned 1 exit status
    error: command 'arm-linux-gnueabihf-g++' failed with exit status 1

    ----------------------------------------
Command "/usr/bin/python3 -u -c "import setuptools, tokenize;__file__='/tmp/pip-install-8ljkk42x/gattlib/setup.py';f=getattr(tokenize, 'open', open)(__file__);code=f.read().replace('
', '
');f.close();exec(compile(code, __file__, 'exec'))" install --record /tmp/pip-record-und_jj_j/install-record.txt --single-version-externally-managed --compile --user --prefix=" failed with error code 1 in /tmp/pip-install-8ljkk42x/gattlib/

Auf welchem Raspi Image habt ihr aufgesetzt?

Hier ist die Anleitung die ich bei mir gespeichert habe :

sudo nano /etc/wpa_supplicant/wpa_supplicant.conf
Go to the bottom of the file and add the following:
network={
    ssid="testing"
    psk="testingPassword"
}

https://www.bitpi.co/2015/02/11/how-to-change-raspberry-pis-swapfile-size-on-rasbian/
sudo nano /etc/dphys-swapfile

sudo su
apt-get update
cd /home/pi
git clone https://github.com/open-homeautomation/miflora.git
cd miflora
wget https://raw.githubusercontent.com/micbuh/KH_MiFlora/master/docs/GetMiFloras.py
apt-get install python3 libglib2.0-dev libbluetooth-dev python3-pip apache2 libboost-python-dev libboost-thread-dev
cd ..

sudo pip3 install pygattlib


sudo apt-get install bluetooth bluez blueman
cd ..
pip3 install btlewrap
nano /home/pi/miflora/GetMiFloras.py
Zeile 8: from miflora.backends.gatttool import GatttoolBackend
ersetzen durch: from btlewrap import GatttoolBackend

Code:
hciconfig hci0 reset
crontab -e
--> 2 ausgewählt (/bin/nano)
am Ende hinzufügen:
Code:
*/10 * * * * python3 /home/pi/miflora/GetMiFloras.py > /var/www/html/plants.log
Strg+O, Enter, Strg+X
--> crontab: installing new crontab
Code:
sudo python3 /home/pi/miflora/GetMiFloras.py
--> DONE!

http://192.168.0.137/plants.log oder /var/www/html/plants.log aufrufen
Datei existiert, drin steht: DONE!

Besten Dank! Die Schritte bis zum

pip3 install pygattlib

sind soweit identisch gewesen. Da hänge ich ja nun.

Als Ausgangspunkt habe ich von hier sowohl die Variante „Raspbian Buster with desktop and recommended software“ als auch „Raspbian Buster Lite“ ausprobiert. Beides mit selbem Ergebnis.:frowning:

Mit welchem Image habt ihr es auf einem Zero W zu Laufen gebracht?

Hier nochmal die Fehlermeldung:

    /usr/bin/ld: cannot find -lboost_python-py34
    collect2: error: ld returned 1 exit status
    error: command 'arm-linux-gnueabihf-g++' failed with exit status 1

    ----------------------------------------
Command "/usr/bin/python3 -u -c "import setuptools, tokenize;__file__='/tmp/pip-install-rxcmoti5/gattlib/setup.py';f=getattr(tokenize, 'open', open)(__file__);code=f.read().replace('
', '
');f.close();exec(compile(code, __file__, 'exec'))" install --record /tmp/pip-record-ay8891y3/install-record.txt --single-version-externally-managed --compile" failed with error code 1 in /tmp/pip-install-rxcmoti5/gattlib/

Ich habe den Zero fertig mit Raspi SD gekauft

Ich habe es damals auf dem Raspeberry 1 installiert. Der hat ja 512 MB internen Arbeitsspeicher, so wie dein Zero w auch.
Vielleicht mal den Swap auf 2 GB (also nicht 1024 sondern 2048) erhöhen?
Sonst fällt mir leider nichts ein…
LG
Adam

Moin

Versuchs mal mit Jessie ich meine ich hatte damals mit stretch ähnliche Probleme.

Viele Grüße
Ralf

Super! Ich habe nun ein Jessie Image von hier geholt und damit lief der „pip3 install gattlib“ durch.:slight_smile:

Anschließend musste ich noch aus BestEx Checkliste

sudo pip3 install btlewrap

ausführen sowie eine Zeile in der /home/pi/miflora/GetMiFloras.py anpassen:

nano /home/pi/miflora/GetMiFloras.py
Zeile 8: from miflora.backends.gatttool import GatttoolBackend
ersetzen durch: from btlewrap import GatttoolBackend

Daraufhin funktionierte auch „python3 GetMiFloras.py“ und es ging laut ReadMe weiter.

Besten Dank an alle soweit! Nun geht es an die Einbindung in IPS :loveips:

Moin, ich hatte durch einen Austausch eines RasPi auch erhebliche Probleme mit dem Python Skript, daher habe ich mir ein bash script gebastelt, das alleine mit gatttool einen Miflora ausliest. Natürlich nur das allerwichtigste, d.h. die aktuellen Pflanzendaten inkl. Batterie und Firmware.

#!/bin/bash

raw=`gatttool -b  $1 --char-read --handle=0x38`
#raw='Characteristic value/descriptor: 19 15 32 2e 37 2e 30'

if [[ $raw =~ Characteristic\ value/descriptor:\ [A-Fa-f0-9]{2}\ [A-Fa-f0-9]{2}\ [A-Fa-f0-9]{2}\ [A-Fa-f0-9]{2}\ [A-Fa-f0-9]{2}\ [A-Fa-f0-9]{2}\ [A-Fa$
    b=$((16#${raw:33:2}))
    f=$(printf '\x'${raw:39:2}'\x'${raw:42:2}'\x'${raw:45:2}'\x'${raw:48:2}'\x'${raw:51:2}'
')
else
    exit 1
fi

raw=`gatttool -b $1 --char-write-req -a 0x33 -n A01F&gt;/dev/null&&gatttool -b  $1 --char-read --handle=0x35`
#raw='Characteristic value/descriptor: 22 00 00 28 02 00 00 1b 04 00 02 3c 00 fb 34 9b'

if [[ $raw =~ Characteristic\ value/descriptor:\ [A-Fa-f0-9]{2}\ [A-Fa-f0-9]{2}\ [A-Fa-f0-9]{2}\ [A-Fa-f0-9]{2}\ [A-Fa-f0-9]{2}\ [A-Fa-f0-9]{2}\ [A-Fa$
    t=$(($((16#${raw:33:2}))+256*$((16#${raw:36:2}))))
    c=$(($((16#${raw:57:2}))+256*$((16#${raw:60:2}))))
    l=$(($((16#${raw:42:2}))+256*$((16#${raw:45:2}))))
    m=$((16#${raw:54:2}))
else
    exit 1
fi
printf 'batt=%s%%;Fw=%s;Temp=%s.%s;Cond=%s;Light=%s;Moist=%s%%
' "$b" "$f" "${t:: -1}" "${t: -1}" "$c" "$l" "$m"
exit 0

Der Aufruf ist einfach:

./miflora.sh C4:7C:8D:xx:xx:xx

und das Ergebnis kalorienarm und parserfreundlich:

batt=26%;Fw=2.7.0;Temp=6.5;Cond=3;Light=151;Moist=27%

Ich verfolge allerdings auch einen leicht anderen Ansatz: Ich schiebe nicht die Daten zum IPS sondern hole sie von dort ab - mit einem shell_exec und Auswertung. Dadurch habe ich die batteriezehrenden Abfragen nur dann, wenn ich sie brauche (falls die Bewässerung aktiv ist) - zudem kann ich auch sehr einfach alle 5min erneut nach einem Sensor fragen, wenn er mal nicht erreichbar ist. Kommt ein vollständiger Datensatz rein, wird der Sensor eben wieder 1h in Ruhe gelassen.

Wer die Daten per mqtt haben will, kann natürlich auch ziemlich einfach statt des letzten printf den mosquitto_pub Befehle hinterherschicken.

Ja, für dieses schöne php-Modul hier also so nicht zu gebrauchen, aber vielleicht findet der Ansatz ja seinen Weg dort rein.

Hallo zusammen,

ich komme mit meinem Zero an dieser Stelle nicht weiter. Ich bin wie in Beitrag #249 vorgegangen und habe es jetzt schon 2017-04-10-raspbian-jessie und 2017-07-05-raspbian-jessie versucht. Bei beiden Anläufen bleibt die Installation an dieser Stelle mit dem nachfolgenden Fehler hängen.

root@raspberrypi:/home# pip3 install btlewrap
Downloading/unpacking btlewrap
Downloading btlewrap-0.0.9.tar.gz
Running setup.py (path:/tmp/pip-build-2bttgj4o/btlewrap/setup.py) egg_info for package btlewrap
Traceback (most recent call last):
File „<string>“, line 17, in <module>
File „/tmp/pip-build-2bttgj4o/btlewrap/setup.py“, line 4, in <module>
from btlewrap.version import version as version
File „/tmp/pip-build-2bttgj4o/btlewrap/btlewrap/init.py“, line 15, in <module>
from btlewrap.base import BluetoothBackendException # noqa: F401,E402 # pylint: disable=wrong-import-position
File „/tmp/pip-build-2bttgj4o/btlewrap/btlewrap/base.py“, line 3, in <module>
from typing import List, Tuple
ImportError: No module named ‚typing‘
Complete output from command python setup.py egg_info:
Traceback (most recent call last):

File „<string>“, line 17, in <module>

File „/tmp/pip-build-2bttgj4o/btlewrap/setup.py“, line 4, in <module>

from btlewrap.version import __version__ as version

File „/tmp/pip-build-2bttgj4o/btlewrap/btlewrap/init.py“, line 15, in <module>

from btlewrap.base import BluetoothBackendException  # noqa: F401,E402 # pylint: disable=wrong-import-position

File „/tmp/pip-build-2bttgj4o/btlewrap/btlewrap/base.py“, line 3, in <module>

from typing import List, Tuple

ImportError: No module named ‚typing‘


Cleaning up…
Command python setup.py egg_info failed with error code 1 in /tmp/pip-build-2bttgj4o/btlewrap
Storing debug log for failure in /root/.pip/pip.log
root@raspberrypi:/home#

Ich hoffe jemand hat eine Idee.
Hast du auch ein Swapfile eingerichtet?

sudo su -c 'echo "CONF_SWAPSIZE=1024" > /etc/dphys-swapfile'
sudo dphys-swapfile setup
sudo dphys-swapfile swapon

Burkhard

Ja hatte ich gemacht.

Ich hab es gerade auch nochmal wiederholt. Der Fehler kommt aber trotzdem.

pi@raspberrypi:~ $ sudo su
root@raspberrypi:/home/pi# sudo su -c ‚echo „CONF_SWAPSIZE=1024“ > /etc/dphys-swapfile‘
root@raspberrypi:/home/pi# sudo dphys-swapfile swapon
root@raspberrypi:/home/pi# pip3 install btlewrap
Downloading/unpacking btlewrap
Downloading btlewrap-0.0.9.tar.gz
Running setup.py (path:/tmp/pip-build-d69l3n2e/btlewrap/setup.py) egg_info for package btlewrap
Traceback (most recent call last):
File „<string>“, line 17, in <module>
File „/tmp/pip-build-d69l3n2e/btlewrap/setup.py“, line 4, in <module>
from btlewrap.version import version as version
File „/tmp/pip-build-d69l3n2e/btlewrap/btlewrap/init.py“, line 15, in <module>
from btlewrap.base import BluetoothBackendException # noqa: F401,E402 # pylint: disable=wrong-import-position
File „/tmp/pip-build-d69l3n2e/btlewrap/btlewrap/base.py“, line 3, in <module>
from typing import List, Tuple
ImportError: No module named ‚typing‘
Complete output from command python setup.py egg_info:
Traceback (most recent call last):

File „<string>“, line 17, in <module>

File „/tmp/pip-build-d69l3n2e/btlewrap/setup.py“, line 4, in <module>

from btlewrap.version import __version__ as version

File „/tmp/pip-build-d69l3n2e/btlewrap/btlewrap/init.py“, line 15, in <module>

from btlewrap.base import BluetoothBackendException  # noqa: F401,E402 # pylint: disable=wrong-import-position

File „/tmp/pip-build-d69l3n2e/btlewrap/btlewrap/base.py“, line 3, in <module>

from typing import List, Tuple

ImportError: No module named ‚typing‘


Cleaning up…
Command python setup.py egg_info failed with error code 1 in /tmp/pip-build-d69l3n2e/btlewrap
Storing debug log for failure in /root/.pip/pip.log
root@raspberrypi:/home/pi#

Hi,
mittlerweile sind die VegTrug Sensoren auf dem Markt ja mehr vertreten, als die originalen Xiamo MiFlora. Optisch sehen die erstmal gleich aus, es gibt für die VegTrug aber wohl eine andere App. Hat schon jemand getestet, ob diese auch mit dem Modul funktionieren?

Gruß

Ich kann mir gut vorstellen, dass es funktioniert, weil ich gerade mal beim großen A geschaut habe und dort einen Artikel gefunden habe, welcher folgendermaßen beworben wird:

VegTrug Plant Monitor Flower Care kompatibel mit Xiaomi MI Home Europäische Version Echtzeit Sensor für Innenbereich, Wasserdicht,Bodenfruchtbarkeit, Feuchtigkeitsgrad, Licht und Temperatur.

Daher denke ich, dass dieser einfach unter einem weiteren Label verkauft wird.

Grüße
Stefan

p.s. Man kann den Sensor ja zurückschicken, wenn er nicht funktioniert.